Perform an Unsupervised Classification
Lesson content
Lesson 1 of 1
Perform an Unsupervised Classification
In this quick guide, you will:
- •
Perform an ISODATA unsupervised classification to categorize varying slope levels. * •
Edit class names and colors.
Sample Data
Download sample data below. Then extract the contents of the .zip file to a local directory.
[USGS_DEM.zip
93.1 MB
DownloadArrow down with horizontal line beneath it](assets/USGS_DEM.zip)
Background
Images from electro-optical sensors often have groups of pixels with statistically similar brightness values. Unsupervised classifiers look for these inherent groups and assign them to discrete classes. They produce a classification image with unknown classes (“Class 1,” “Class 2,” and so forth). You can optionally identify the features they most likely represent and label them accordingly.
Unsupervised classification is often used as a pre-processing step to determine the variability of pixel values and where spectrally uniform regions occur in an image. Thus, it can help you explore the data before proceeding to more in-depth spectral analyses.
Open an Image
- 1
Select File > Open from the Menu bar. An Open dialog appears. 2. 2
Go to the location where you saved the sample data, and select the file USGS_NED19_Slope.dat. 3. 3
Click Open. The slope image is added to the Layer Manager and displayed in the Image window. 4. 4
In the Layer Manager, right-click on USGS_NED19_Slope.dat and select Zoom to Layer Extent.
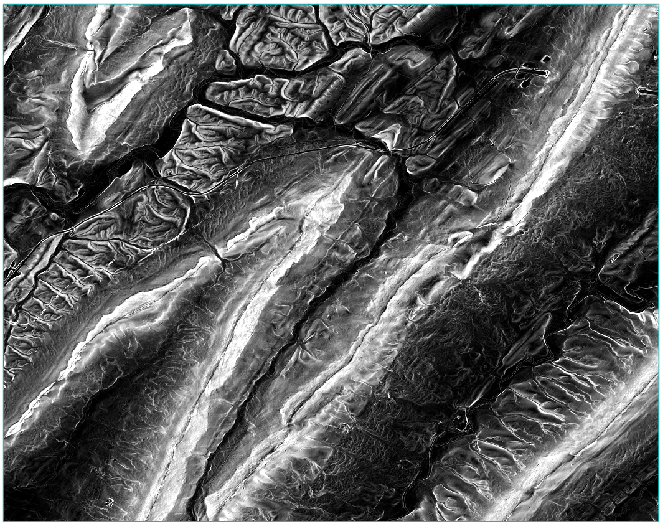
Brighter pixel values indicate steeper slopes. Dark pixels indicate areas with little or no slope.
When categorizing the different slope values, you could use ENVI’s Raster Color Slice tool to divide the pixel values into discrete ranges. Then you would assign a unique color to each range of values. However, unsupervised classification offers a unique perspective because it can extract more “natural” groups from the data. You will perform unsupervised classification in the next section.
Run ISODATA Classification
ENVI provides two tools for unsupervised classification: ISODATA and K-Means. The ISODATA classifier is a reliable, general-purpose classifier. It clusters pixels using minimum distance thresholds. It iterates through the image multiple times, recalculating class means, measuring distances, and reclassifying pixels with respect to the new means.
Next, you will use the Classification Workflow to perform an ISODATA unsupervised classification on the slope image.
- 1
In the Toolbox, expand the Classification folder and double-click Classification Workflow. The workflow begins with the File Selection panel. The Raster File field lists USGS_NED19_Slope.dat as the input file. 2. 2
Click the Next button to proceed to the Classification Type panel. 3. 3
Keep the default selection of No Training Data. Unsupervised classification does not use any training data. 4. 4
Click the Next button to proceed to the Unsupervised Classification.
The next step is to determine the number of output classes you want. That depends on your overall objective. How detailed do you want the classification? As previously mentioned, unsupervised classification is often used as a data exploration technique to understand how spectral data is inherently categorized into different groups.
- 5
Keep the default selection of 5 classes. 2. 6
Click the Next button. ENVI creates a preview of the classification result.

Five classes are listed (Class 1, Class 2, … Class 5) with an additional “Unclassified” class.
- 7
Uncheck and check the Unsupervised Classification layer in the Layer Manager to compare the classification image with the underlying slope image. You should be able to tell that the cyan-colored class (#5) represents areas with the steepest slopes. The red class (#1) corresponds to flat areas. There are no Unclassified pixels in this image.
The Cleanup panel is displayed next. Cleanup is recommended if you plan to save the classification vectors to a file in the final step of the workflow. Performing cleanup significantly reduces the time needed to export classification vectors. This step of the workflow uses smoothing and aggregation operations. Smoothing reduces speckling noise. Aggregation removes small, isolated regions of pixels. The following images show an example from a subset of the classification image:

- 8
Keep the default values for Smooth Kernel Size and Aggregate Minimum Size. The aggregation operation will filter out groups of pixels that contain less than 9 pixels. 2. 9
Click the Next button. ENVI creates a preview of the cleaned-up classification result. When processing is complete, the workflow proceeds to the Export panel. 3. 10
Uncheck the Export Classification Vectors option. For this exercise, you will only create a classification image. 4. 11
In the Output Filename field for Export Classification Image, enter a file name of SlopeClasses.dat. 5. 12
Click the Finish button. The slope classification image is added to the Layer Manager and displayed in the Image window.
The classes are not associated with any particular feature at this point. With unsupervised classification, you need to determine what the classes represent, based on the underlying data. Then you can assign new names and colors to the classes. Since the classes do not represent specific, quantitative measures, you can give them names that are more objective, such as “Flat”, “Medium slope”, etc.
Edit Class Names and Colors
- 1
Right-click on the Classes folder in the Layer Manager and selectEdit Class Names and Colors. The Edit Class Names and Colors dialog appears. 2. 2
Select Class 1 in the Class Names list. In the Edit field immediately underneath it, replace Class 1 with Low Slope. Press the Enter key on your keyboard to accept the name change. 3. 3
With Class 2 selected, change its name to Low to Moderate Slope. Press the Enterkey. 4. 4
With Class 3 selected, change its name toModerate Slope. Press the Enter key. 5. 5
With Class 4 selected, change its name to Moderate to High Slope. Press the Enter key. 6. 6
With Class 5 selected, change its name to High Slope. Press the Enter key.

- 7
Optionally change the colors for each class. To do this, select a class in the Class Colors list. Click the color box below the list, then change the color accordingly.

- 8
Click OK in the Edit Class Names and Colors dialog to update the class names and colors. The changes are written to the associated ENVI header file (SlopeClasses.hdr). The next time you load this image into ENVI, the new names and colors will be retained.
Here is an example:

- 9
This concludes the exercise.
Additional Resources
- •
Edit Class Names and Colors quick guide * •
ENVI Machine Learning Tutorial: Unsupervised Classification(opens in a new tab) (PDF)
Your input is important to us, please take a few moments to fill out ourQuick Guide Feedback(opens in a new tab)form.
© 2024 NV5 Geospatial Solutions, Inc. This information is not subject to the controls of the International Traffic in Arms Regulations (ITAR) or the Export Administration Regulations (EAR).