Create Pan-Sharpened Images
Lesson content
Lesson 1 of 1
Create Pan-Sharpened Images
Open and Display QuickBird Images
- 1
Select File > Open from the Menu bar. An Open dialog appears. 2. 2
Go to the "data" directory in your ENVI installation path.
Windows: C:\Program Files\NV5\ENVIxx\data (xx is the version number)
Linux: /user/local/NV5/envixx/data
Mac: /Applications/NV5/envixx/data
3. 3
Use the Ctrl key to multi-select qb_boulder_msi and qb_boulder_pan. Click Open. The grayscale panchromatic image is displayed first.

The image metadata in the lower-right corner of ENVI shows that its spatial resolution (“Pixel Size”) is 0.7 meters.
- 4
Use the Zoom tools to zoom into the panchromatic image. Or, rotate the scroll wheel on your mouse to zoom in. 2. 5
In the Layer Manager, toggle the checkbox next to qb_boulder_pan on and off to compare it with the multispectral image (qb_boulder_msi). The panchromatic image shows more detail in small objects such as vehicles, compared to the multispectral image; for example:
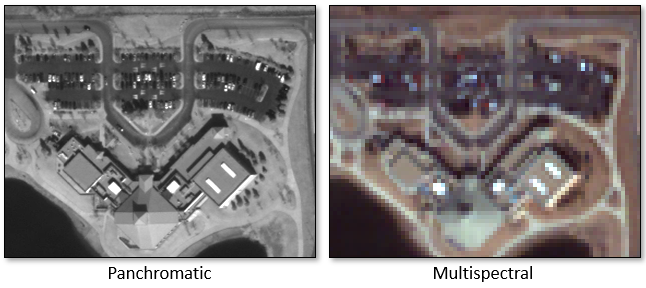
The spatial resolution of the multispectral image is 2.8 meters, or four times the resolution of the panchromatic image. It has four spectral bands:
- •
Blue - centered on 485 nm * •
Green - centered on 560 nm * •
Red - centered on 660 nm * •
Near-infrared (NIR) - centered on 830 nm
The panchromatic image consists of one band with a wide spectral coverage: 450 to 900 nm. You can see the trade-off: low spectral resolution and high spatial resolution. Panchromatic images are often used for reconnaissance and detailed visual observation, versus analyzing the spectral properties of materials at the surface.
Create a Pan-Sharpened Image
When panchromatic and multispectral data are both available from the same imaging platform, you can fuse the two datasets to create a product that combines spectral information with high-resolution pixels. The following steps describe how to fuse a high-spatial-resolution panchromatic image with the multispectral image. The result is a pan-sharpened image.
You will use the NNDiffuse Pan Sharpening tool for this exercise. It works best when the spectral response function of each multispectral band has minimal overlap with one another, and the combination of all multispectral bands covers the spectral range of the panchromatic raster. It requires that the panchromatic and multispectral images line up exactly, using the upper-left corner as a starting reference point. The NNDiffuse algorithm is based on the following reference:
Sun, W., B. Chen, and D.W. Messinger. "Nearest Neighbor Diffusion Based Pan Sharpening Algorithm for Spectral Images." Optical Engineering 53, no. 1 (2014).
- 1
In the search window of the Toolbox, enter nndiffuse. 2. 2
Double-click the NNDiffuse Pan Sharpening tool. 3. 3
In the NNDiffuse Pan Sharpening dialog, click the Browsebutton next to Input Low Resolution Raster. The Data Selection dialog appears. 4. 4
Select qb_boulder_msi and click OK. 5. 5
Click the Browsebutton next to Input High Resolution Raster. The Data Selection dialog appears. 6. 6
Select qb_boulder_pan and click OK. 7. 7
In the Pixel Size Ratio field, enter a value of 4. The ratio of multispectral spatial resolution to panchromatic spatial resolution is 2.8 meters to 0.7 meters, or a value of 4. 8. 8
Leave the Spatial Smoothness and Intensity Smoothness fields blank. These are advanced parameters that are part of the NNDiffuse algorithm. See the NN Diffuse Pan Sharpening(opens in a new tab) topic in ENVI Help for details. ENVI automatically determines the best values to use for these parameter when you click OK and run the tool. 9. 9
Enter an output file name of qb_boulder_pansharpened.dat.

- 10
Click OK. When processing is complete, the pan-sharpened image is added to the Layer Manager and displayed in the Image window. 2. 11
Zoom in and pan around the image. Notice how it reveals a high level of detail while providing color that is natural to your eyes; for example:

- 12
This concludes the exercise.
In summary, pan-sharpened images can be used for subsequent geospatial analysis. The accuracy of the analysis largely depends on the accuracy of the pan-sharpening algorithm. When multispectral image pixels are fused with panchromatic pixels, it can potentially compromise the spectral integrity of the data. Thus, some caution is needed when using pan-sharpened images for spectral analysis on a precision scale.
Your input is important to us, please take a few moments to fill out ourQuick Guide Feedback(opens in a new tab)form.
© 2024 NV5 Geospatial Solutions, Inc. This information is not subject to the controls of the International Traffic in Arms Regulations (ITAR) or the Export Administration Regulations (EAR).