Export ENVI Models
Lesson content
Lesson 1 of 1
Export ENVI Models
This quick guide provides an overview of three different ways to export an ENVI Model.
Once you have created an ENVI model, there are alternative ways to interact with and run the model instead of running it directly in the Modeler window. You can:
- Generate an IDL Program or ENVI Extension
- Generate an ENVI Metatask
- Generate a Python Program
You can access these options from the Code tab on the ENVI Modeler menu bar.
In this quick guide, you will open an example model that ships with ENVI and make the necessary modifications to export it as each of the three options listed above.
- 1
Open ENVI Modeler: Display > ENVI Modeler. An Untitled tab appears with an empty layout window. 2. 2
SelectFile > Open Example, to expand the list of example models that ship with ENVI. 3. 3
Click on Simple Model. This brings up the model shown below:

- 4
We can remove the comment nodes to reduce clutter for the purpose of this quick guide.
Press and hold the Ctrl key and left click on each of the grey comment nodes to highlight all 4. Right click and select Delete.
This is the base model we will use for this quick guide:

Generate an IDL Program or ENVI Extension
You can generate IDL pro code from the ENVI Modeler. This can be helpful if you are learning how to code in IDL and want to start building automated workflows that run without the need for a Graphic User Interface. You can test out a workflow in ENVI, then create the corresponding model, and finally export the model as pro code that you can use directly as is, or as the starting point for more complex code.
You must have an ENVI+IDL license to use this feature
To generate IDL code from the ENVI Modeler:
- 1
Select Code > Generate IDL Program from the Modeler menu bar.
This opens the corresponding IDL code in a new Program window, as shown below:

From here, you can:
- Save the code to an IDL program file (.pro), by clicking the Save button.
- Run the program, by clicking the Run button.
- Create an ENVI Extension, by clicking the Create Extension button.
Let's create an extension:
- 2
Within the IDL Program window, select the Create Extension button. This brings up the Create ENVI Extension dialog. 2. 3
Provide your choice of Extension Name, for instance: Calculate ISODATA.
The extension location defaults to the extensions folder within your ENVI installation directory.

- 4
Click OK. You will see an Information dialog detailing where the extension file was saved:

Your new Extension will now appear under the Extensions folder in your ENVI Toolbox:

- 5
Double click on your new Extension. This brings up the Input Parameters panel for your model, which in this case only requires an Input Raster to run. 2. 6
Click on the ellipsis next to Input Raster. This opens the Data Selection dialog. 3. 7
Click on the Open File icon and navigate to the "data" directory in your ENVI installation path:
Windows: C:\Program Files\NV5\ENVIxx\data (xx is the version number)
Linux: /user/local/NV5/envixx/data
Mac: /Applications/NV5/envixx/data
4. 8
Click Open. Highlight qb_boulder_msi in the Data Selection dialog, then click OK. 5. 9
Click OK on the original dialog. This starts the model run, which produces an output classification raster that is displayed in the main ENVI window.
Generate Metatasks
A metatask is a task that contains other tasks. If you have a model that contains many elements, you can create metatasks to enclose multiple task nodes.
There are two options, depending on whether you want to save and reuse the new task, or you just want to use it as part of the current model:
- To collapse all nodes into a single node within the model, click onEdit > Create Task from Model
- To save the model as a task that will be saved on disk and becomes available among the other ENVI Tasks in your task list, click on Code > Generate Metatask.
You should define input and output parameters for a model before creating a task or metatask from your model.
Data Manager nodes will be ignored.
The task you create will have an input arrow if an Input Parameters node was present in the original model, and output arrow if an Output Parameters node was present in the original model.
Let's consider a variation of the Simple Example model from above. The input is provided using a Dataset node, instead of an Input Parameters node, which we have hardcoded to the path of the same input file. We have also removed the Data Manager output node, leaving only the View node.

Since this model has no Input Parameters or Output Parameters nodes, the metatask you create will not have arrows for inputs or outputs. The image below shows the content of the new Untitled layout window that is created after selecting Edit > Create Task from Model. The task name will match the model name, in this case ISODATA_smooth:

In order to provide inputs and/or outputs to the model, we can add Input and Output Parameters nodes:

You can download this version of the model here:
[ISODATA_smooth.model
2 KB
DownloadArrow down with horizontal line beneath it](assets/ISODATA_smooth.model)
- 1
Download the ISODATA_smooth.model file provided above and save it to your local files. 2. 2
Drag and drop the model file into the ENVI Modeler Layout window, or select File > Open, and navigate to the folder where you saved this model. 3. 3
To create a Task from this model, select Edit > Create Task from Model.
This time, the task that is created will have input and output arrows, as shown below:

- 4
Click on the folder icon in the ISODATA_smooth metatask node, highlighted in red in the image above.
This brings up a new layout window showing the contents of the metatask.
Now let's explore creating a separate metatask rather than collapsing the model into a single task:
- 5
Select Code > Generate Metatask. A Metatask panel appears displaying the task code.
From here, you can:
- Save the code to a task file (.task), by clicking the Save button.
- Run the task, by clicking the Run button
- Create an IDL Program, by clicking the Show as IDL Program button
- Publish the task, by clicking the Publish Task button
- 6
Select Publish Task. This brings up a Publish Metatask dialog that prompts you to give a name, display name, description, revision, tags and location for your new metatask.

- 7
Leave the default inputs in the dialog, similar to what is shown in the above screenshot. 2. 8
Click OK. You will get a message letting you know that the file has been saved.
Your new task will now appear and be searchable in the Tasks panel:

Generate Python Programs
You can also generate Python code from a model if you plan to use Python to interact with the ENVI Task Engine(opens in a new tab).
Python programs will not display results or add them to the Data Manager in ENVI. To preserve the outputs, you must use an Output Parameters node.
Python programs require an Output Parameters node to preserve output rasters or vectors in the output folder. Other intermediate files will be deleted.
Input Parameters nodes are not supported by Python programs. You must specify actual datasets and values for the model inputs.
The current version of the model already contains an Output Parameters node. However, we must change the Input Parameters node back to a hardcoded input.
- 1
Right click on the Input Parameters node, select Delete. 2. 2
Select Dataset under Basic Nodes. This opens a Select Type dialog. 3. 3
Select Raster. This brings up the Data Selection panel. The qb_boulder_msi file should be open from before. If not, use the Open File icon to browse it. 4. 4
Select qb_boulder_msi and click OK. This places a blue dataset icon in your layout window. 5. 5
Connect the qb_boulder_msi node to the ISODATA Classification node.
The final, Python Program compatible model that will preserve the output raster looks as follows:

To create the Python program:
- 6
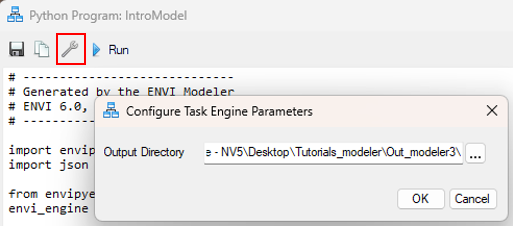
From the ENVI modeler menu bar, select Code > Generate Python Program. This opens the corresponding Python code in a new Program window, as shown below.

From here, you can:
- Save the code to a Python program file (.py), by clicking the Save button.
- Run the program, by clicking the Run button.
- Set the output directory that the Python program will write the generated files to by clicking on the Configure Task Engine button, as shown in the image below:
To run the generated Python code, you must have installed: Python, pip, and either ENVI Py Engine(opens in a new tab)(if you will not be using ArcGIS Pro), or ENVI Py for ArcGIS Pro(opens in a new tab) (if you plan to use ArcGIS Pro).
This concludes this quick guide.
Your input is important to us, please take a few moments to fill out ourQuick Guide Feedback(opens in a new tab)form.
© 2024 NV5 Geospatial Solutions, Inc. This information is not subject to the controls of the International Traffic in Arms Regulations (ITAR) or the Export Administration Regulations (EAR).